Most common Windows programs support larger than 72-point fonts, including Notepad, WordPad and Word 2013, but you wouldn't know it by looking at their selection options. All three of these programs cap out at 72 points in the font options, but you can manually override this imaginary limit by directly entering a size or using hot keys.
Notepad

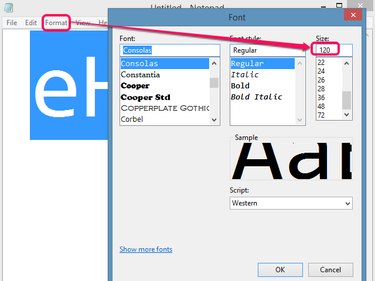
Being a basic text editor, Notepad lacks quick, font-size hot keys and styles that are available in other programs, and doesn't offer a clear way of changing font size at all. However, hidden in the Format menu, the Font option presents the selected text's font, effects and size. Although the Size drop-down menu limits you to 72 points, manually entering a number higher than 72 forces selected text to exceed that limit.
Video of the Day
WordPad

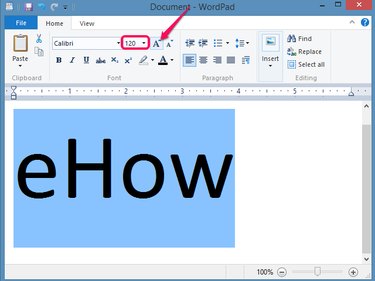
WordPad integrates font size options in the Home tab's Font group where you can directly enter sizes larger than 72 points. Alternatively, click the Grow Font button to increase the font size in small increments or press Ctrl-Shift-> to accomplish the same effect.
Word 2013

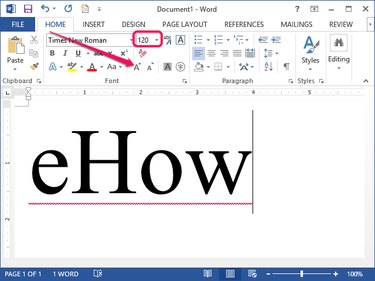
Word behaves similarly to WordPad in that it allows direct entry and incremental increases in font sizes from the Home tab's Font group. Likewise, the same Ctrl-Shift-> hot key increases the font size of selected text in small steps each time you press the key combination.

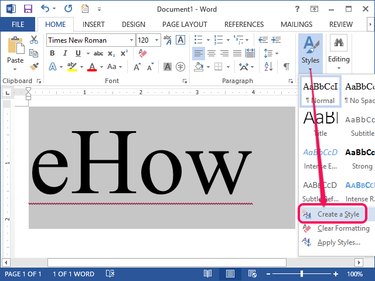
Unlike WordPad and Notepad, however, Word 2013 supports styles. If you frequently use a large font size, creating a Style enables time-saving, one-click selection in the future. Select the newly resized text, click the Styles drop-down menu and select Create a Style. After choosing a name for the style, it appears in the list of styles on the Home tab. Clicking this style automatically applies the font size, and any other configured effects, to selected text.
Printing Suggestions
Printing reasonably large fonts won't change how you print, but extremely large fonts could produce unexpected results. To optimize your prints, consider the following suggestions for Word 2013:
- Click the View tab and select Print Layout from the Views group to ensure the onscreen display matches the upcoming print.
- Click the Page Layout tab and select Landscape from the Page Setup group's Orientation drop-down menu to print horizontally, giving your printout more space for large words. Likewise, choose Portrait if you need more vertical room.
- Click the Page Layout tab, select Size and choose the paper size that matches the printer's paper size. If the size you need isn't listed, choose More Paper Sizes for more options, including a manually configurable Custom Size option.
- Click the Margins drop-down menu from the Page Layout tab and choose narrower margins to accommodate more text.
- Click New and search for a template to aid in constructing various large font projects, such as banners or posters. Not only do the templates save you work, they are also designed with the project in mind. However, most are created to accommodate letter-size paper, so you'll need to assemble the printouts into the final form.
- Avoid zooming the display from the View tab; although this makes the text appear large on the screen, it has no effect on the printout itself.