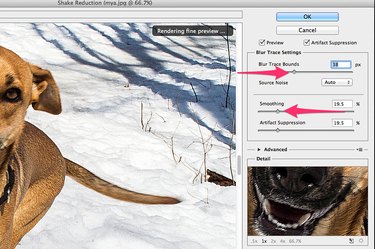
Motion blur can be caused by a moving subject, a moving camera or both. While the best way to reduce motion blur is to increase your camera's shutter speed while taking a photo, this isn't always possible. To reduce motion blur in Photoshop CC (2014), the Shake Reduction filter or the Smart Sharpen filter can help. Photoshop relies on the pixels in the photo to generate sharper images, so choose a high resolution photo with only a small amount of blur. Unfortunately, if you have an extremely blurry image, or an extremely low resolution image, there's not much even Photoshop will be able to do with it.
Using the Shake Reduction Filter
Step 1
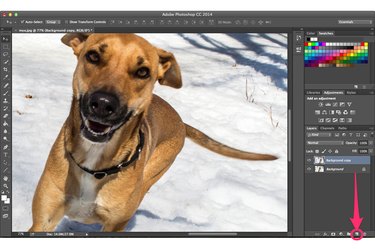
Open your blurry image in Photoshop. Make a copy of the image layer by dragging the "Background" layer onto the "New Layer" button in the Layers Panel.
Video of the Day
Step 2
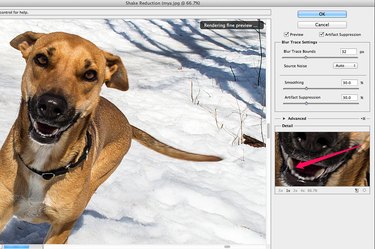
Select "Sharpen" from the Filters menu and click "Shake Reduction." This filter works well for any slight blurriness caused when the model is quickly approaching the camera, when the wind shakes the camera, or when the photographer is bracing himself for an impending pounce. Drag the "Preview" thumbnail to center it on the details you want sharpened.
Step 3
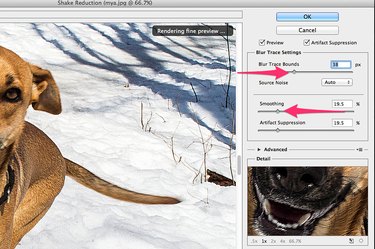
Drag the "Blur Trace Bounds" slider to the right to increase the sharpness. Drag the "Smoothing" slider half-way to the right to reduce noise in the photo, then drag it slowly to the left until you find a good balance between too much noise and too much smoothing. If the image has ghosting (duplicated edges), halos or other artifacts around sharpened edges, increase the Artifact Suppression to reduce or remove them.
Step 4
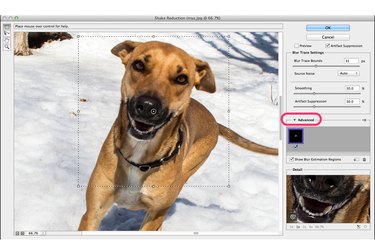
Click the "Advanced" arrow to focus the filter on a particular area of the photo. For example, if the blur is caused more by the subject than by camera shake, you can drag the focus to the subject so the filter doesn't affect the background. Use the "Handles" around the selection outline to resize the area of focus if needed.
Using the Smart Sharpen Filter
Step 1
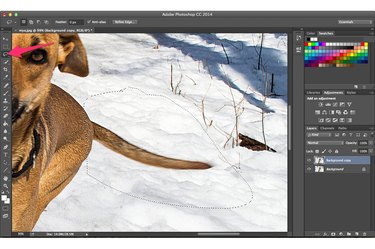
Select the "Lasso Tool" from the Toolbox and drag it around an area if you want to sharpen only one portion of an image. Select "Sharpen" from Photoshop's Filter menu and select "Smart Sharpen." This filter is useful for a variety of situations, including motion blur caused by moving cars or wagging tails.
Step 2
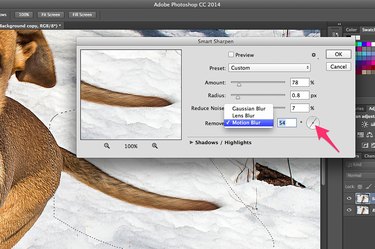
Select "Motion Blur" from the Remove menu, then drag the "Compass" so it's aligned with the direction of motion. Drag the "Amount" slider to control the amount of sharpening. A higher Radius value increases the number of surround pixels that will also be sharpened. Increasing the Reduce Noise value adds more smoothing over the sharpened area. The settings depend on how blurry the image is and its resolution. Start by moving the "Reduce Noise" slider to "0." Adjust the "Amount" and then the "Radius" until the picture looks crisp, then slowly increase the "Reduce Noise" value to smooth the edges.
Step 3
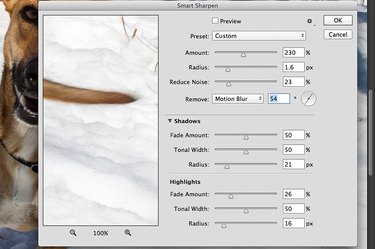
Click the "Shadows/Highlights" arrow to control how much sharpening to apply to dark and light areas in the photo. This is very useful, for example, when you have a dark object moving across the snow. The Fade Amount adjusts the amount of sharpening you already applied to the overall photo for the shadows or highlights. The Tonal Width controls the range of tones affected by the sharpening. A smaller Tonal Width means that only the brightest or darkest areas will be affected, while a higher Tonal Width affects more of the mid-tones.
Step 4
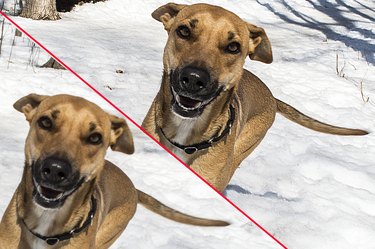
Click the "Opacity" option at the top of the Layers panel and drag the slider all the way to the left to compare this sharpened layer to the blurry layer beneath. If you want to make the photo sharper, try one of the sharpen filters again. If you feel the image is too sharp, select "Fade" from the Edit menu after applying a filter. Alternatively, reduce the opacity of the sharpened layer to about 50 percent so that it blends into the blurry image below.